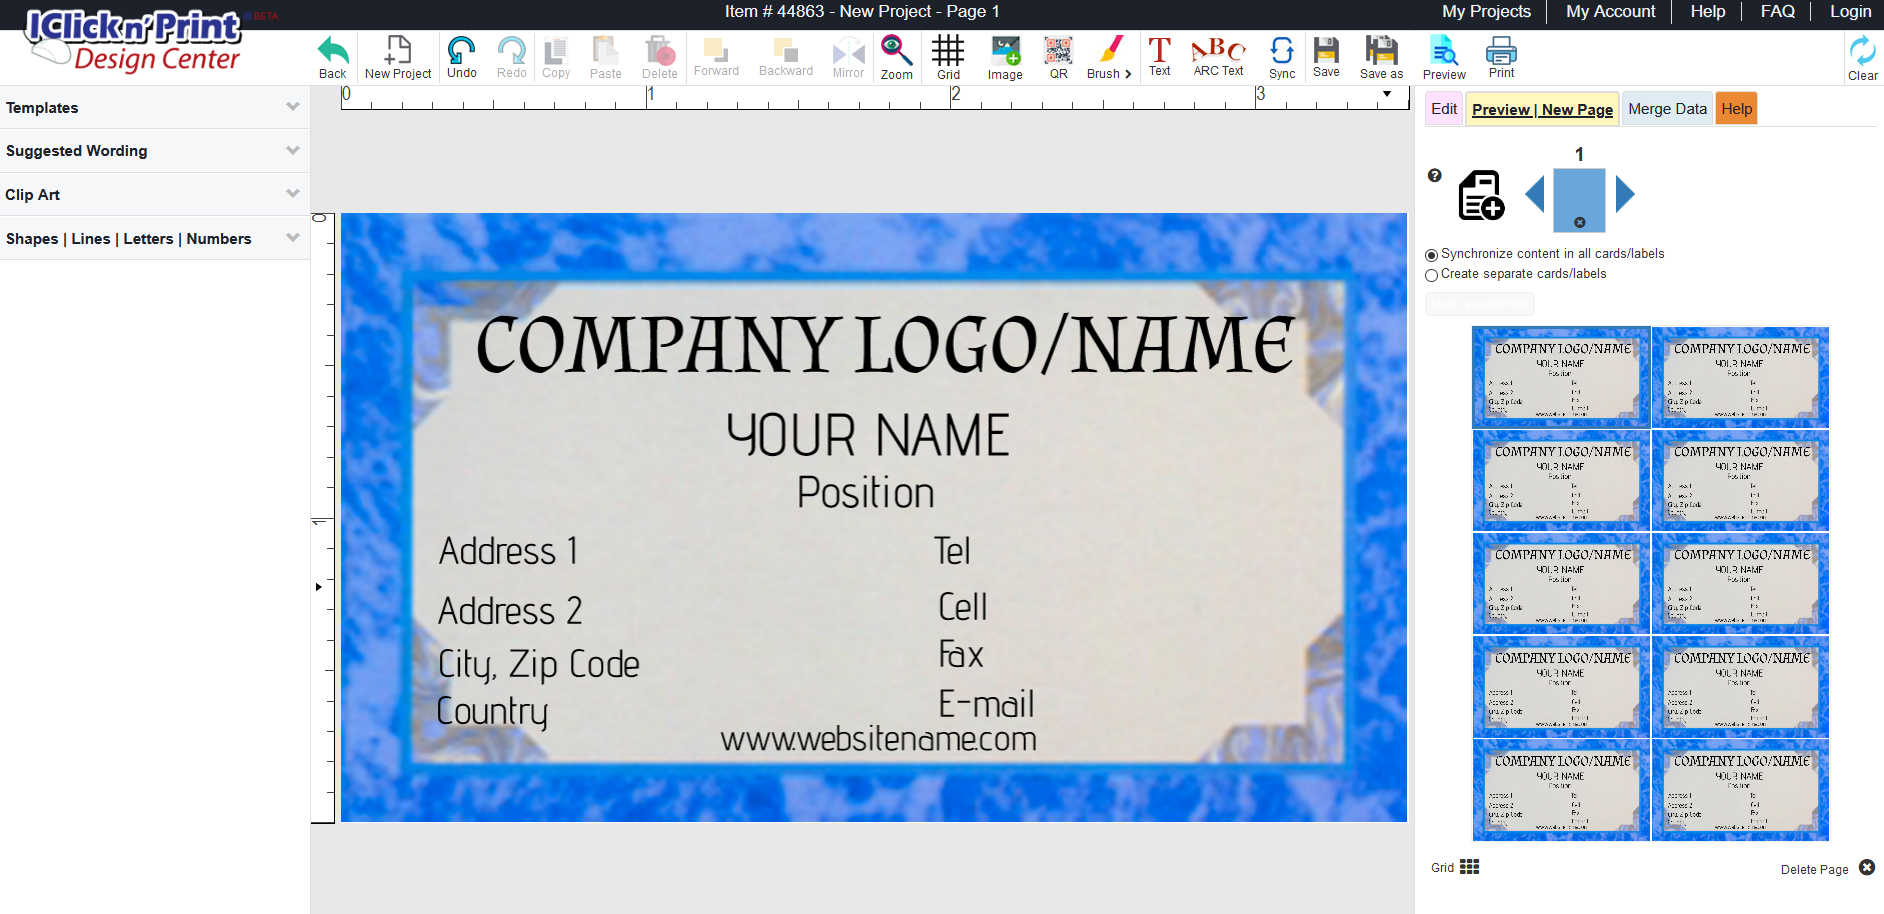
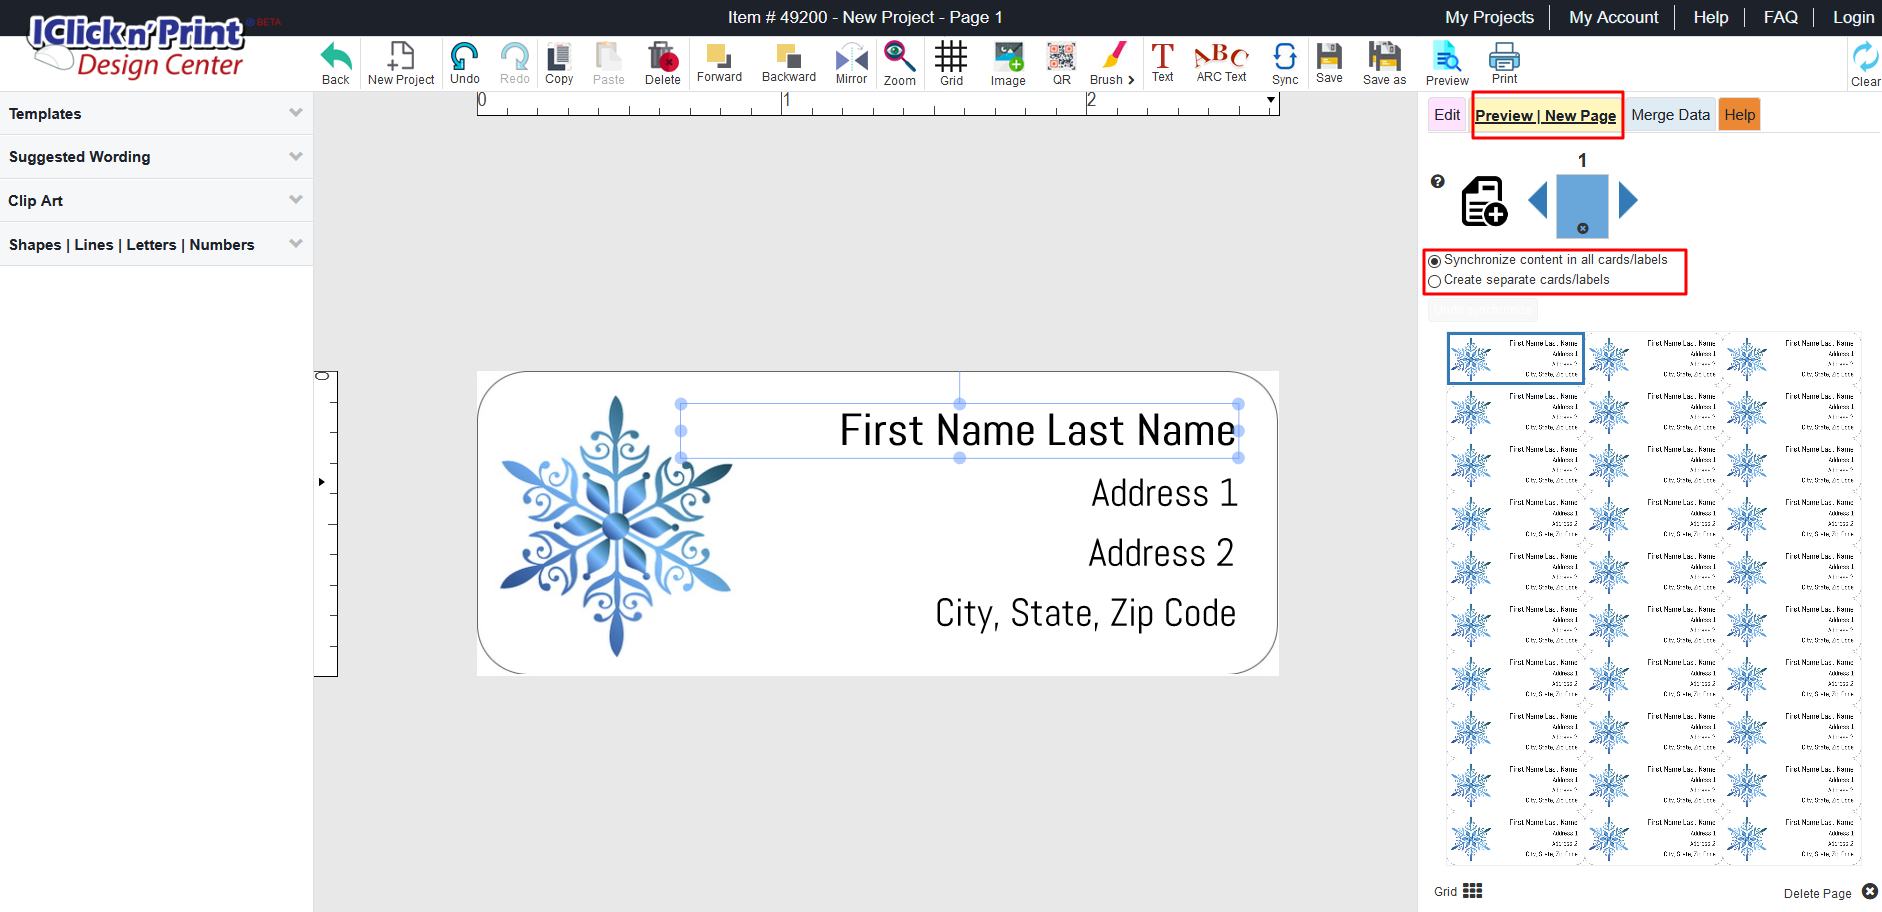
When you customize cards, the most important tab after Edit is Preview | New Page.
Here, where you can choose to synchronize the content or to customize individual cards with unique content.
See image attached.
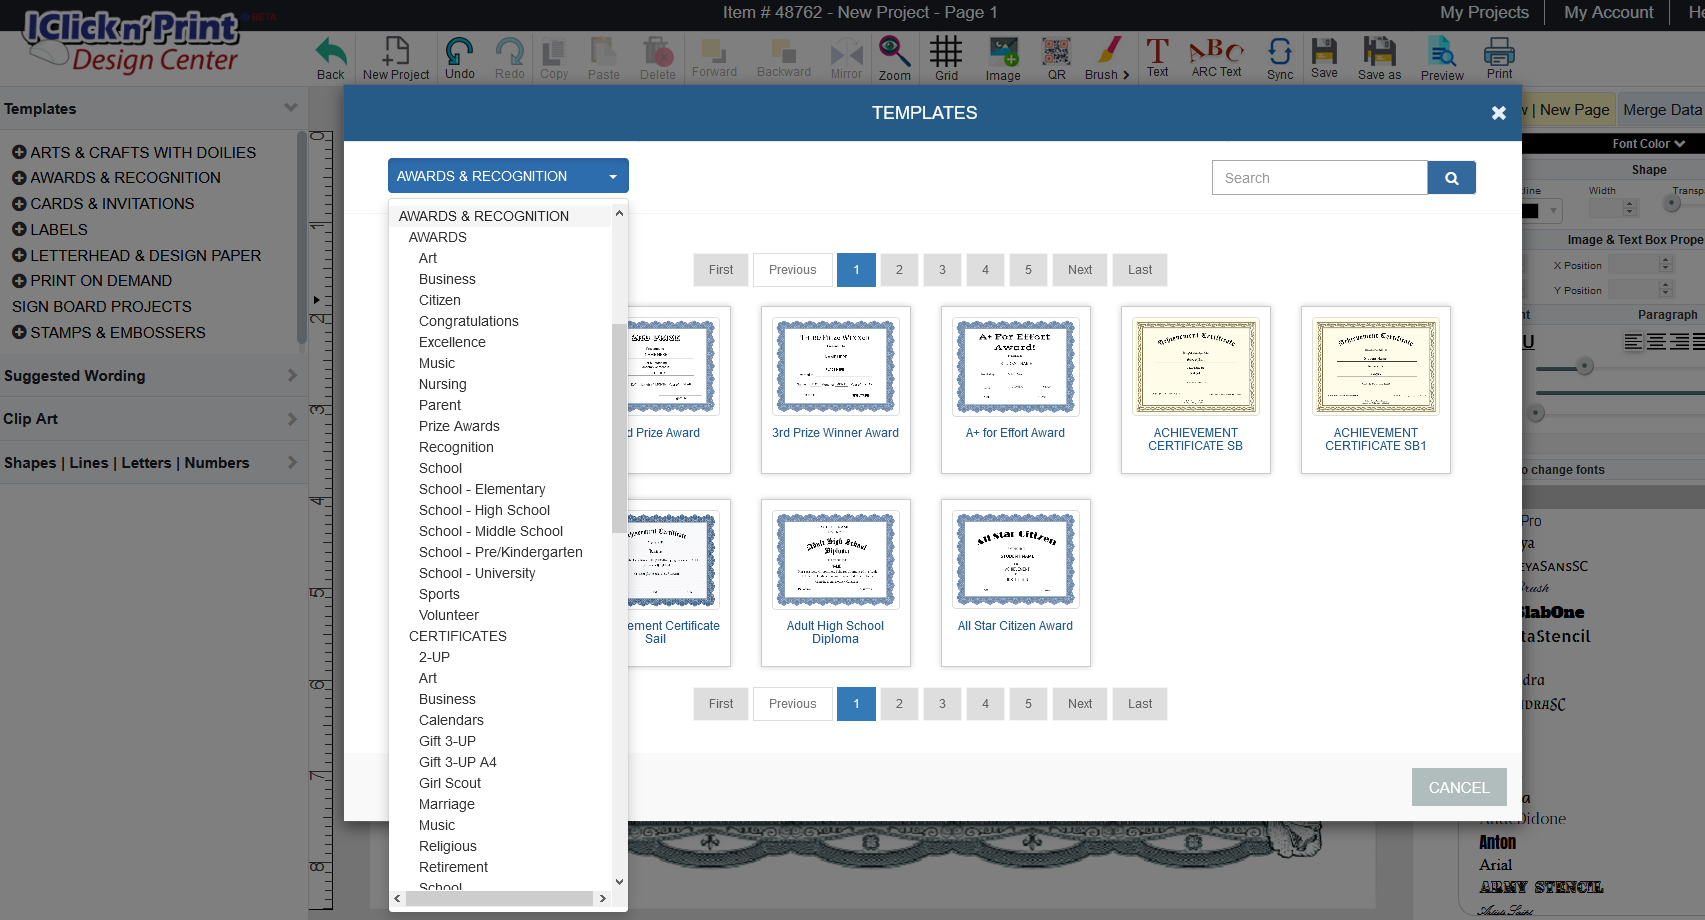
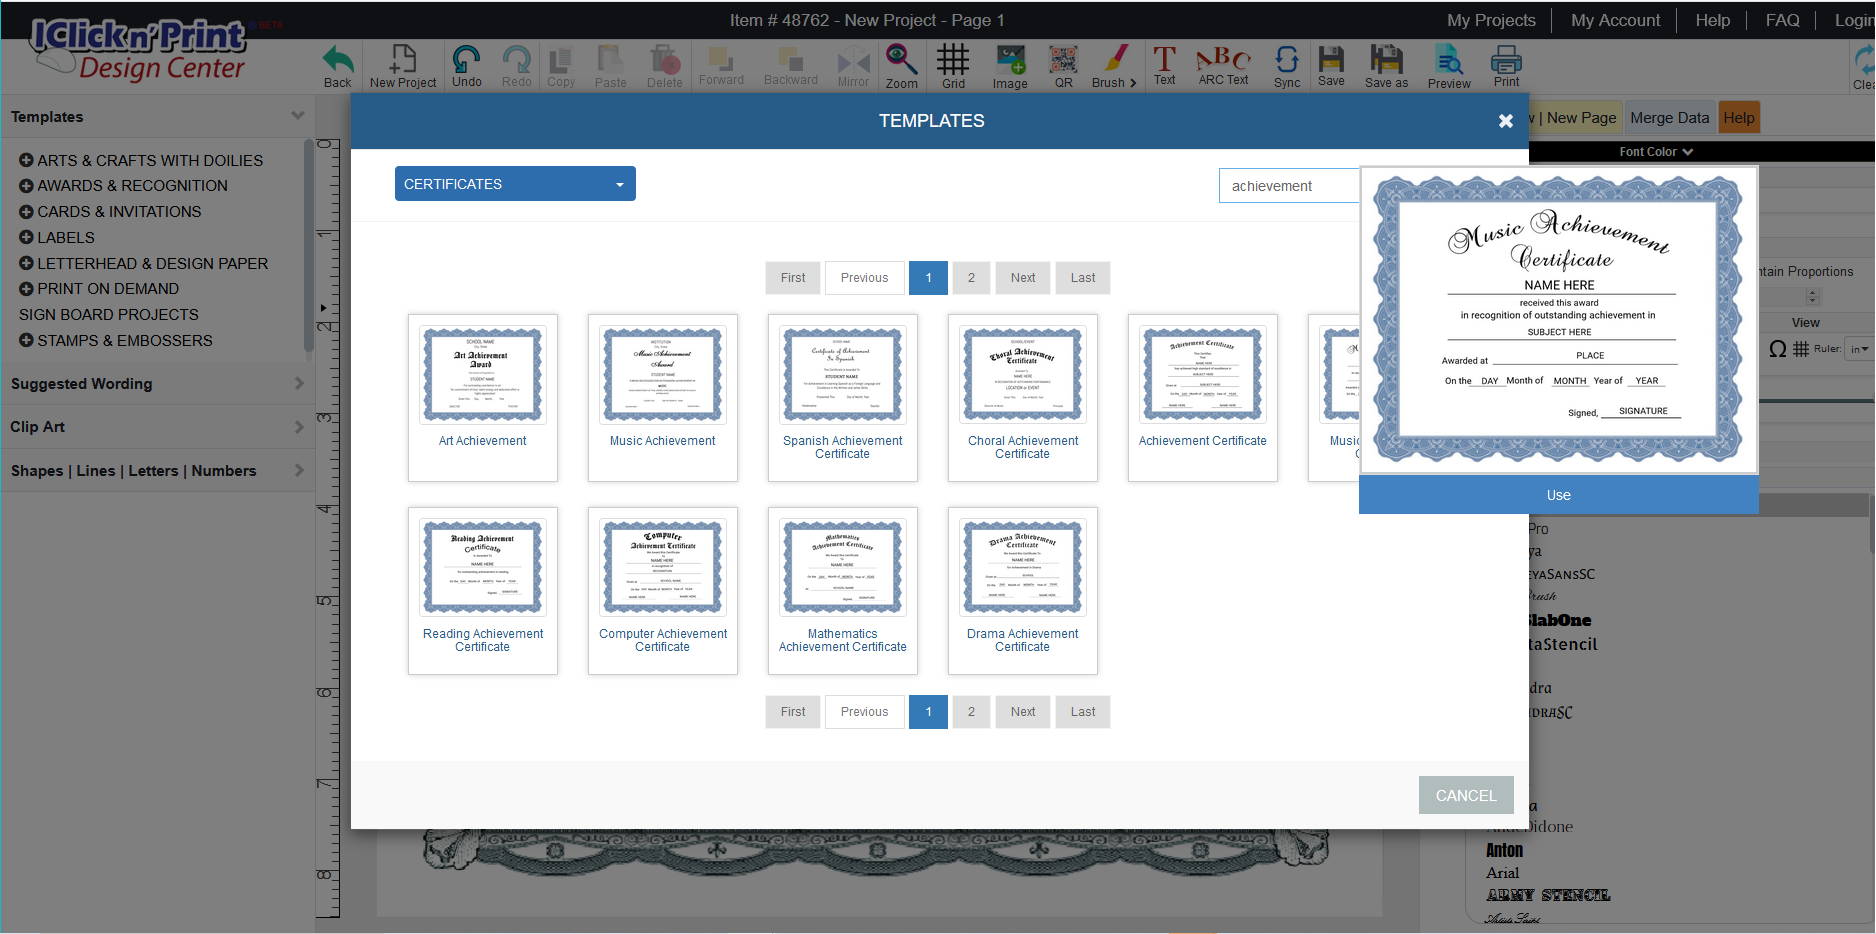
The Templates category located in the left menu has multiple categories and subcategories of templates by theme and holiday. If you are customizing a certificate - choose Awards & Recognition and select your theme from Select Category drop-down. Use a template of choice with click on Use. Wait until the template loads. Start customizing or choose a different template. The new template will replace the existing one. To start from scratch, press New in the main menu (top).
Use the template of your choice and click on the text boxes to edit the pre-set content.
You may change the position of text boxes, shapes, lines, images.
You may want to remove certain elements and change fonts, font sizes and color. Do this by first, highlighting the text in the box you plan on editing. You may replace existing images.
Do this by uploading image from your computer, or by adding clip art and word art images from the left menu.
Browse by Templates category and subcategory to find what you want - click on the plus + sign to open these categories.
Click on a subcategory name directly or open one from the pop up screen called TEMPLATES. Use the scroll bars to scroll up and down, left and right.
See image attached.
Or, click on a subcategory name and in the pop-up screen, enter a keyword in the search box:
See image attached.
Create your own template using Clip Art and Wording or contact us to let us know if an important template is missing.
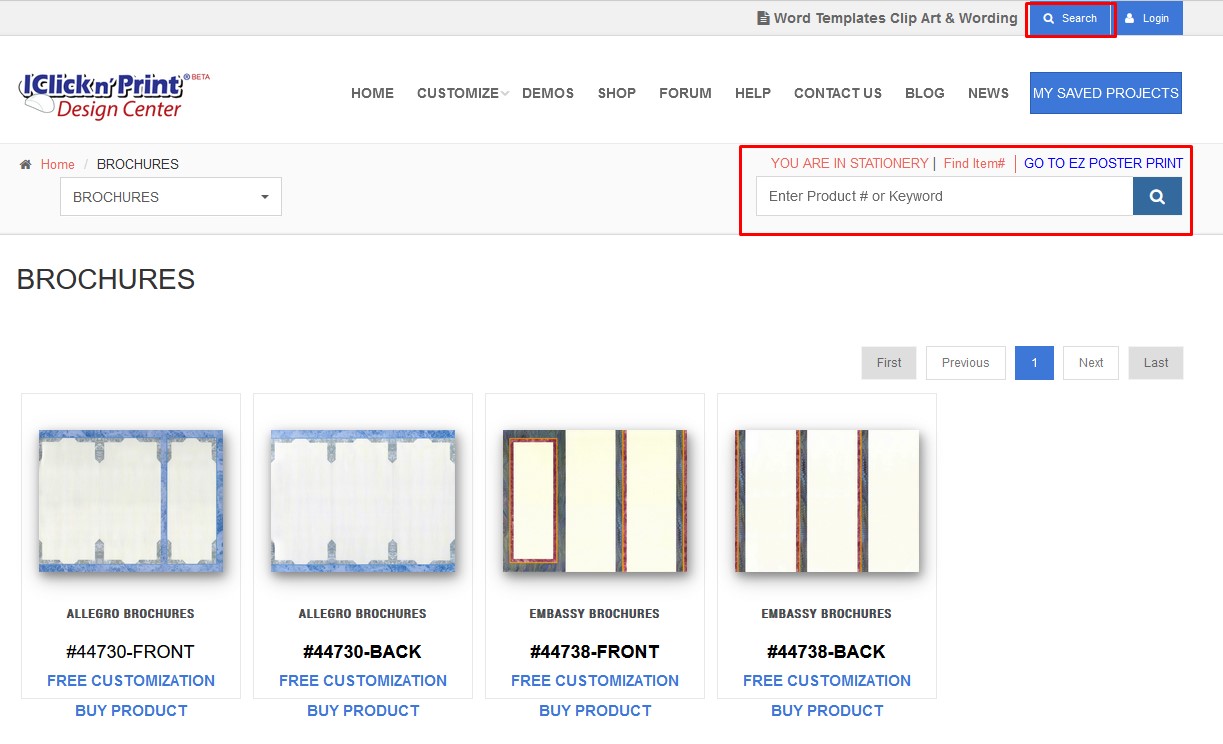
Find Templates:
Search Templates:
Certain Geographics® and Royal Brites® items come with preset text boxes - default templates that have been created for you and appear when you select an item.
Examples may be certain cards, mailing labels and items that would require repetitive work.
Most items can use the customized templates - left menu Templates.
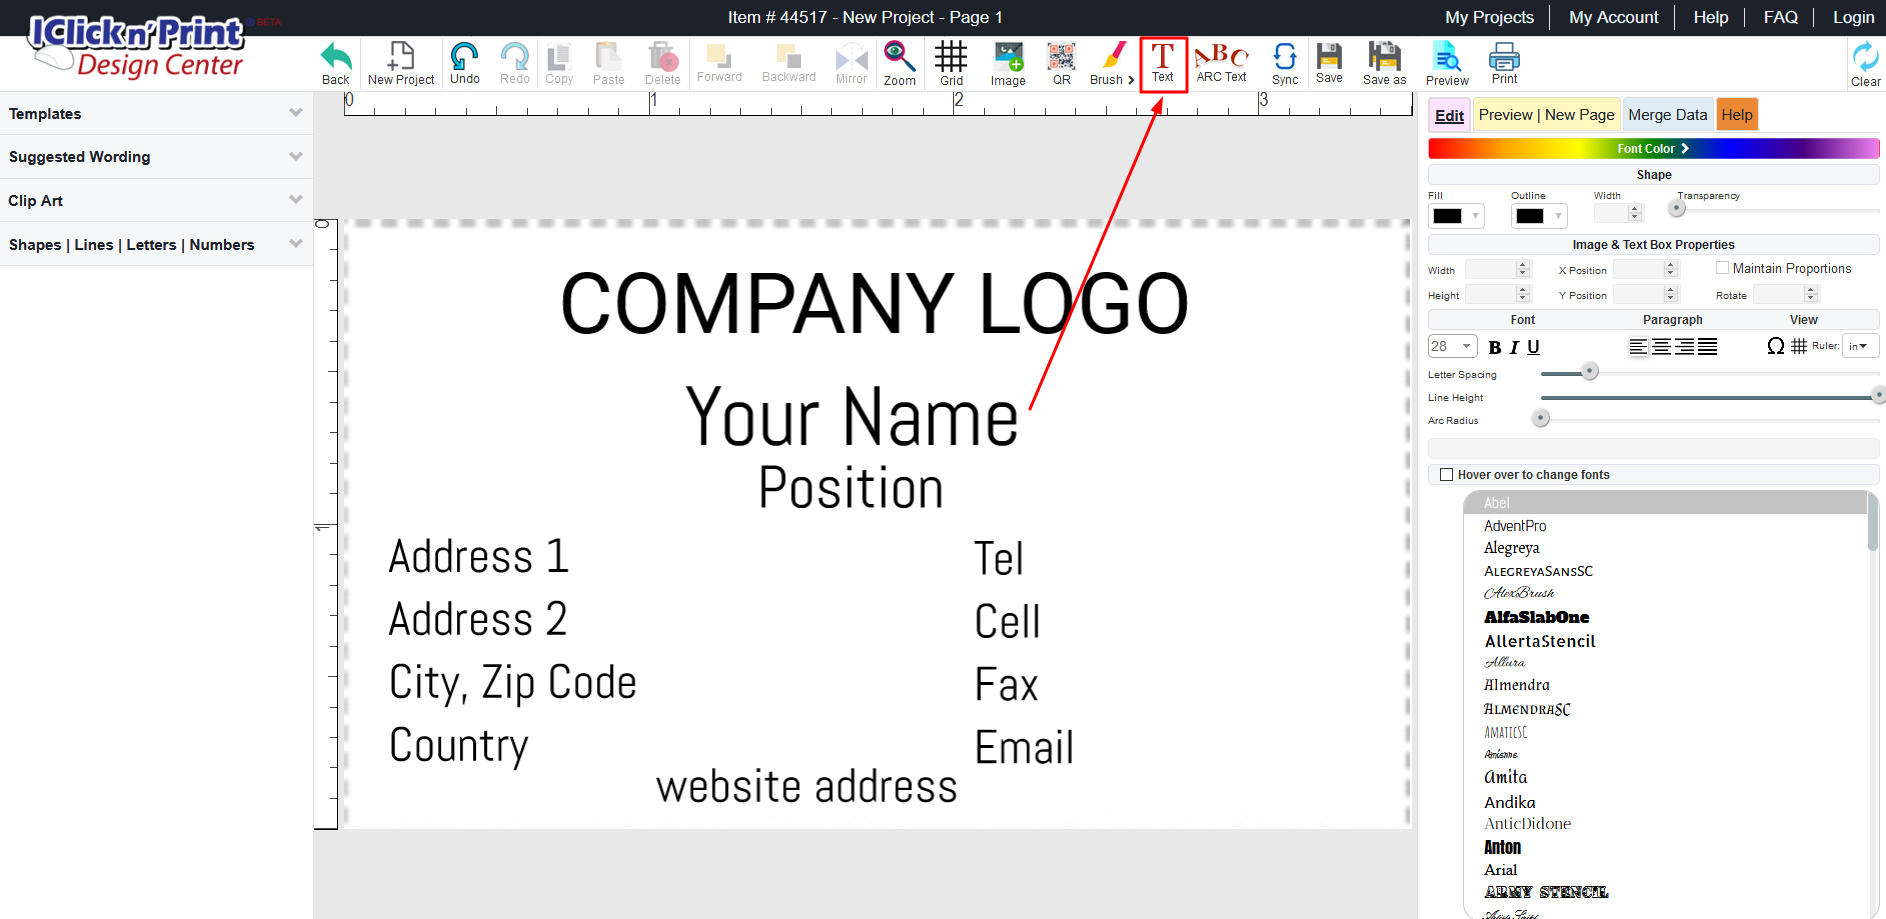
In order to add your information, please click on the "T Text" option from the upper menu of the project sheet, double click inside the text box until the line starts blinking and you can start typing.
The text box can be resized by dragging the outer corners of it and it can be dragged and dropped anywhere on the project sheet.
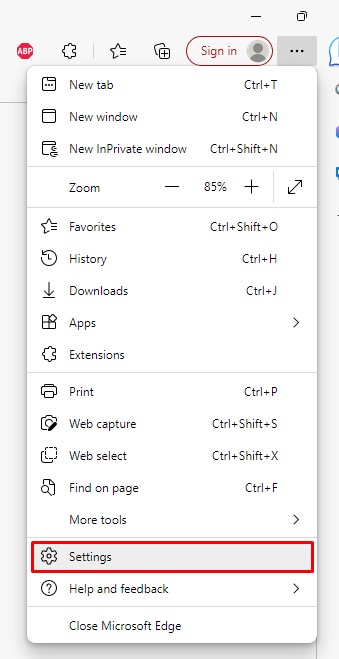
To locate the template of the item, please click on the Search button and insert your item number (just the digits, without description or “#”) and hit Enter.
Then click on Customize Now under the item's image, select the correct orientation for your item and you will be taken into our program where you can customize your purchased item.
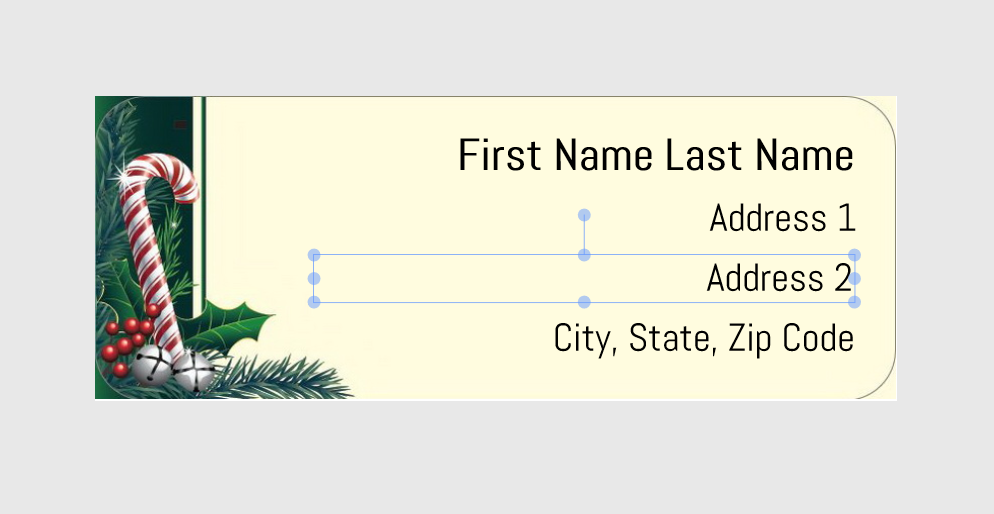
When you customize mailing labels, the most important tab after Edit is Preview | New Page.
Here, you can choose to synchronize the content or to customize individual cards with unique content.
See image attached.
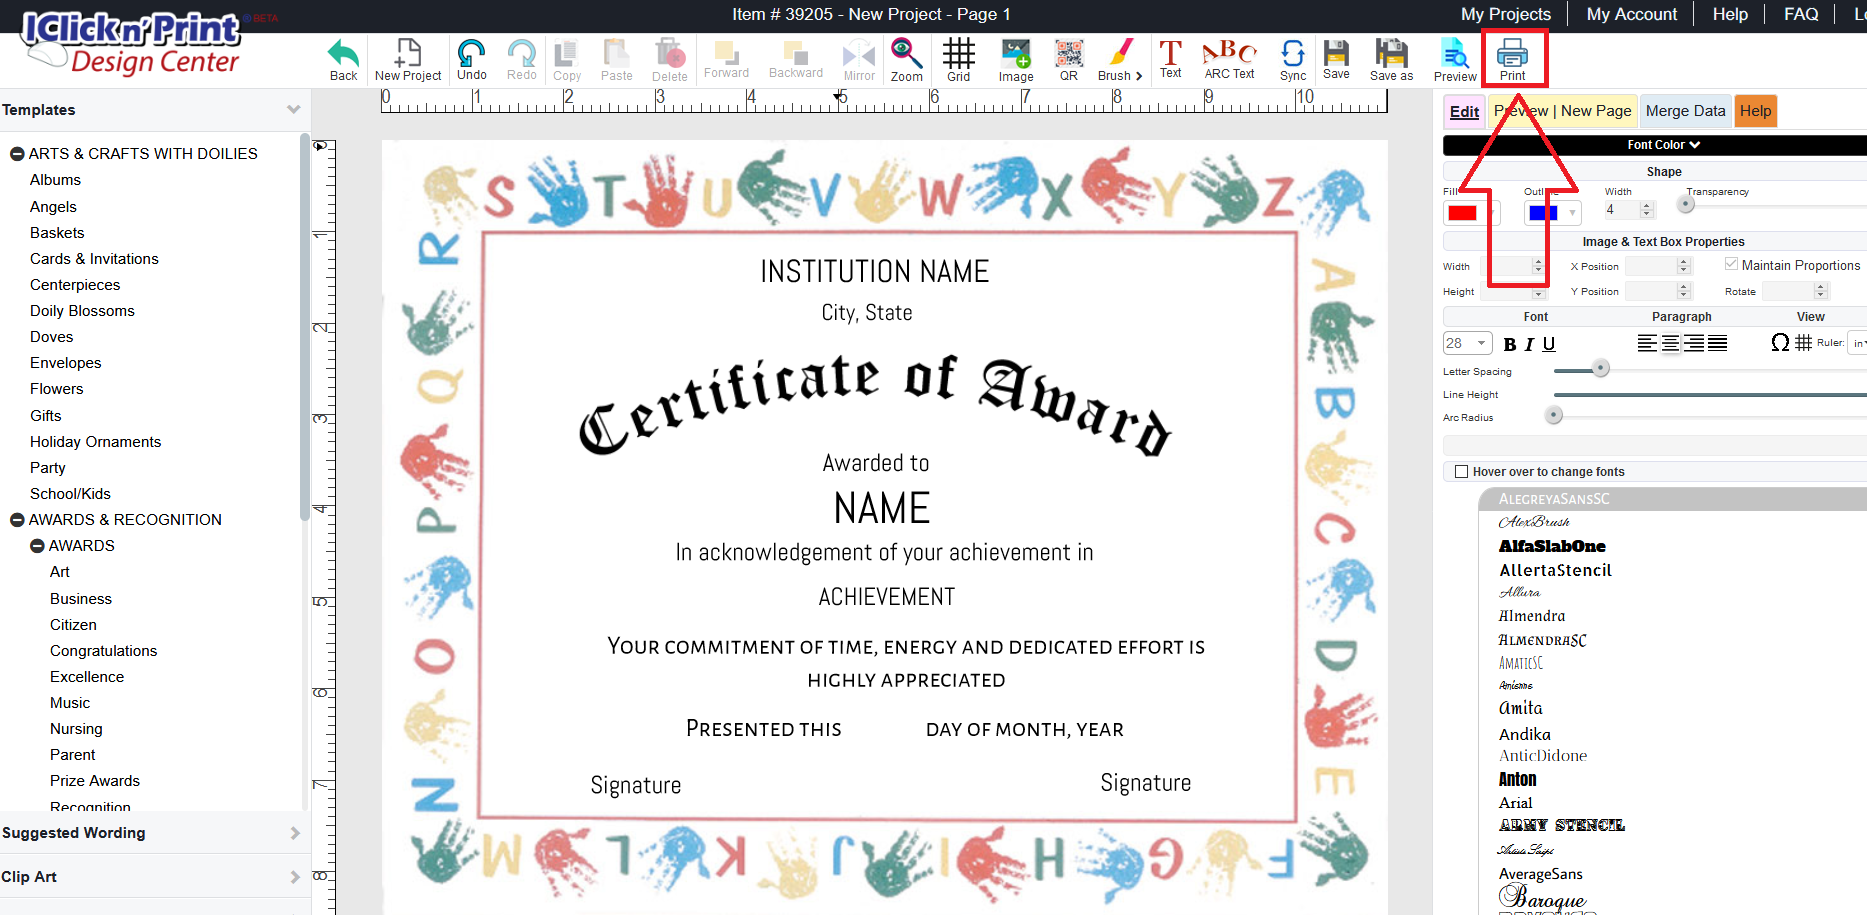
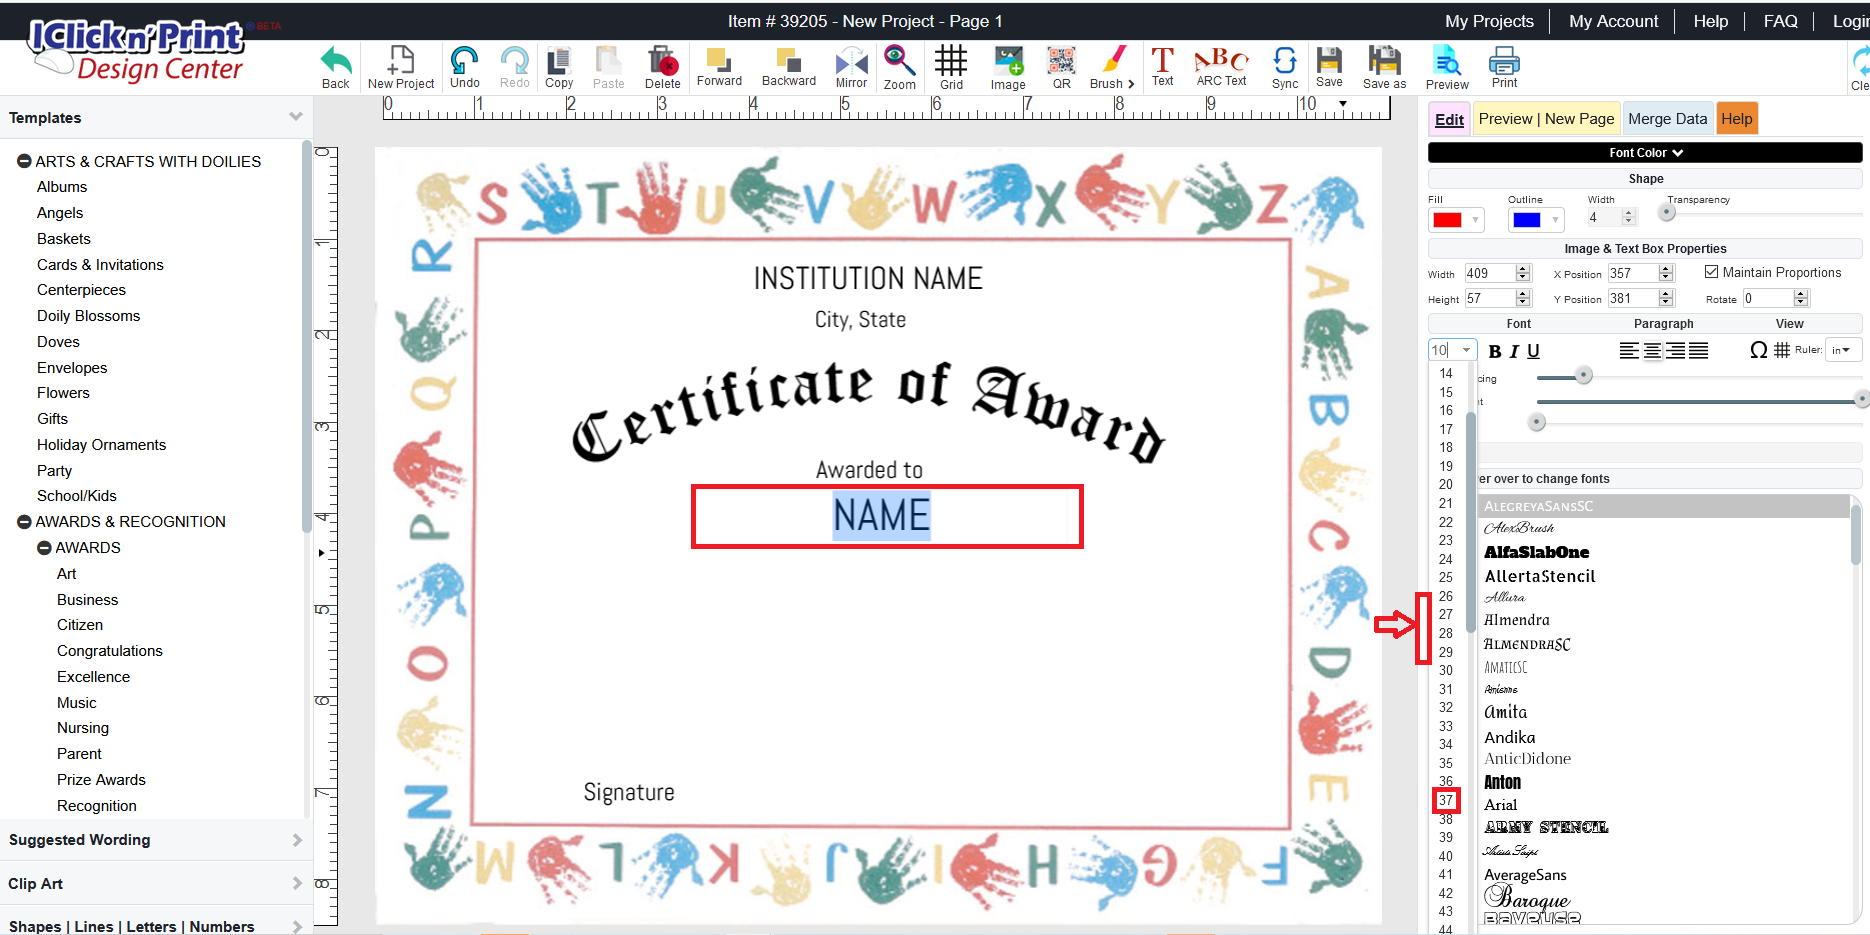
When you customize cards, the most important tab after Edit is Preview | New Page.
Here, where you can choose to synchronize the content or to customize individual cards with unique content.
See image attached.
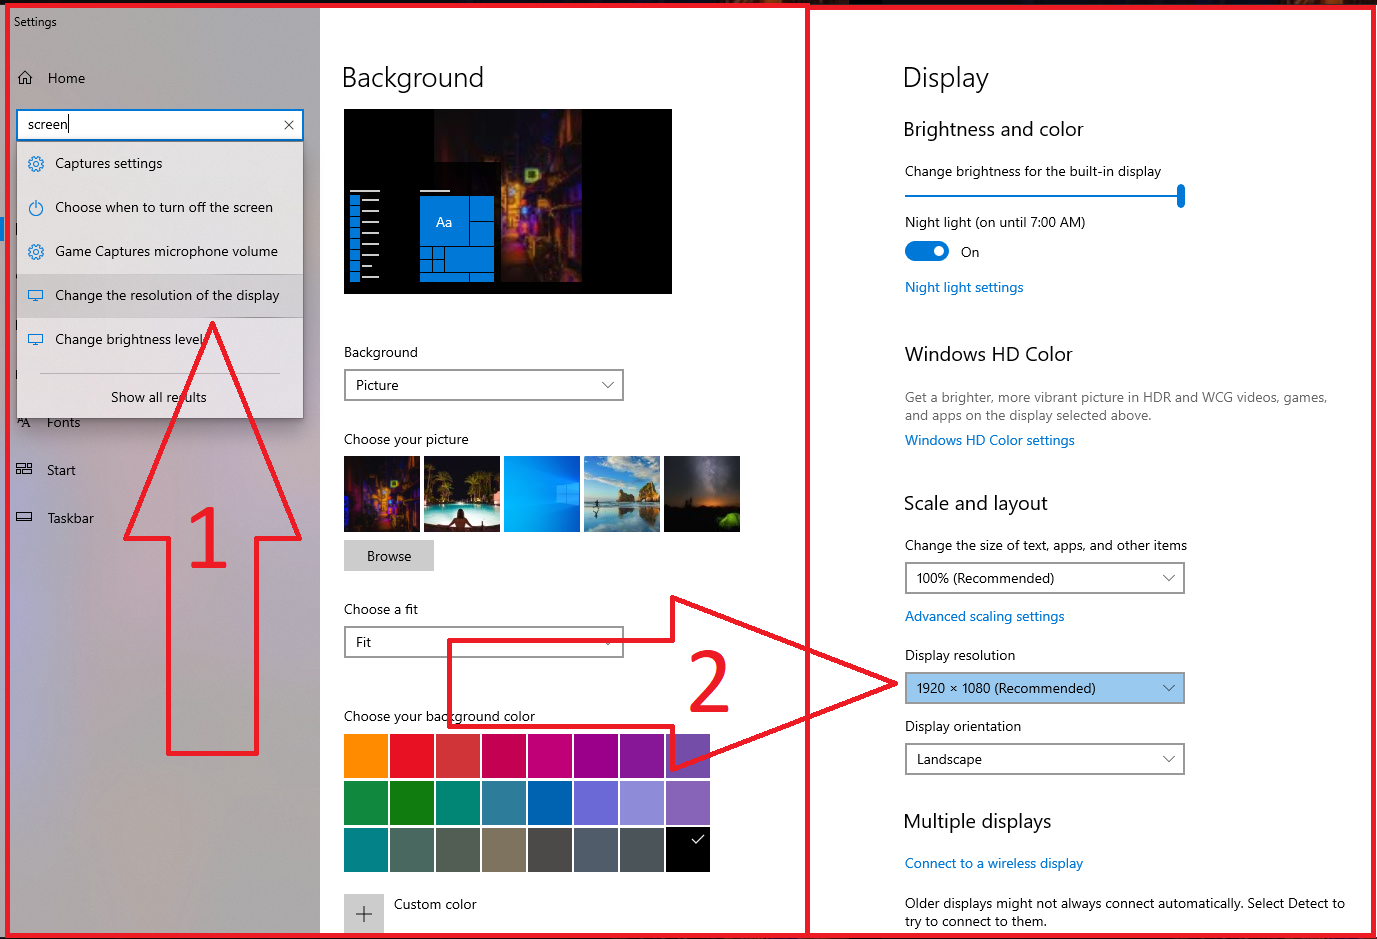
Change your screen resolution to see the entire Iclicknprint screen - so you can use all the menus and features available.
Please see image attached.
Recommended browsers:
SAFARI USERS - DOWNLOAD GOOGLE CHROME - see links below. Safari is not working well with Iclicknprint!
Download Google Chrome for MAC or PC | Mozilla Firefox for PC | Mozilla Firefox for MAC
HOW TO USE MERGE IN ICNP (IClicknPrint)
Watch a demo video for the product you wish to customize
Use FORUM for more answers to your questions.
IMPORTANT!
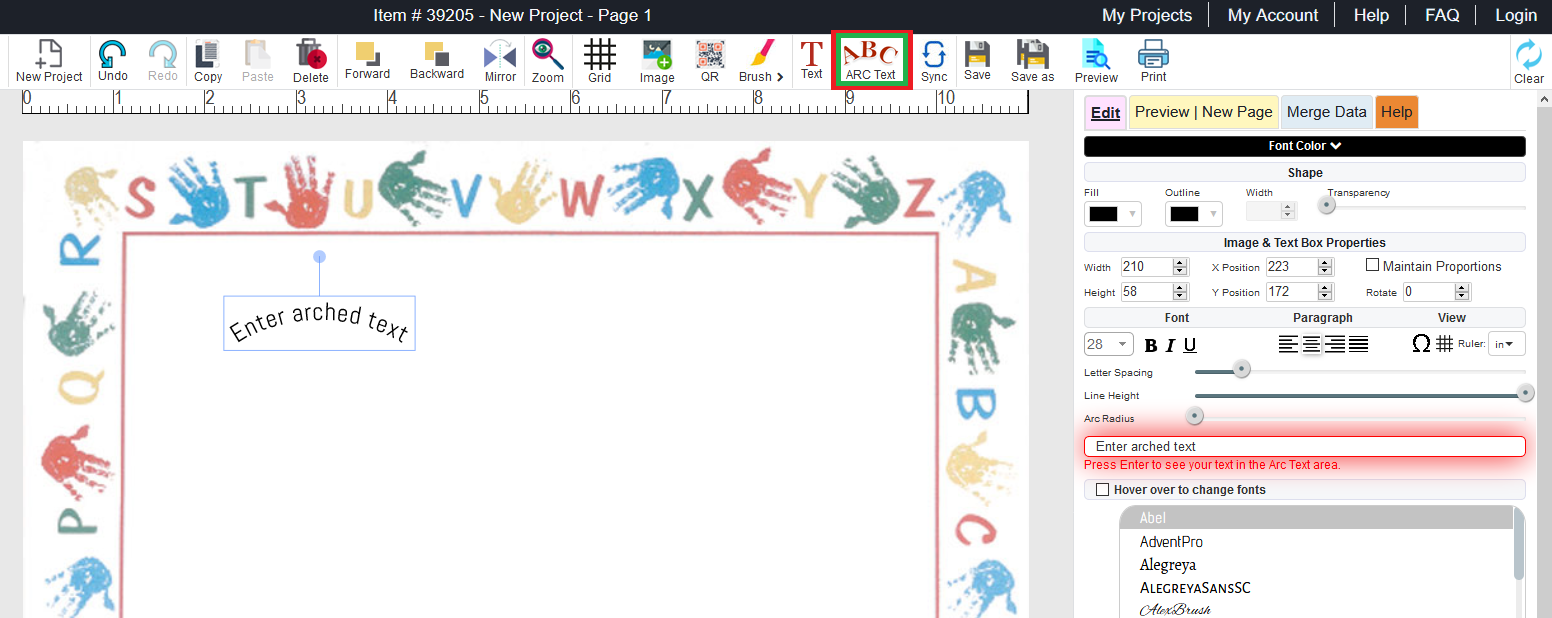
Click on the ARC Text Icon in the top main menu - right - see image attached.
A text box will appear in your project. Do not type in it..
Edit text in the right panel red box “Enter arched text”..
Press enter to see your text in the Arc text box in your project..
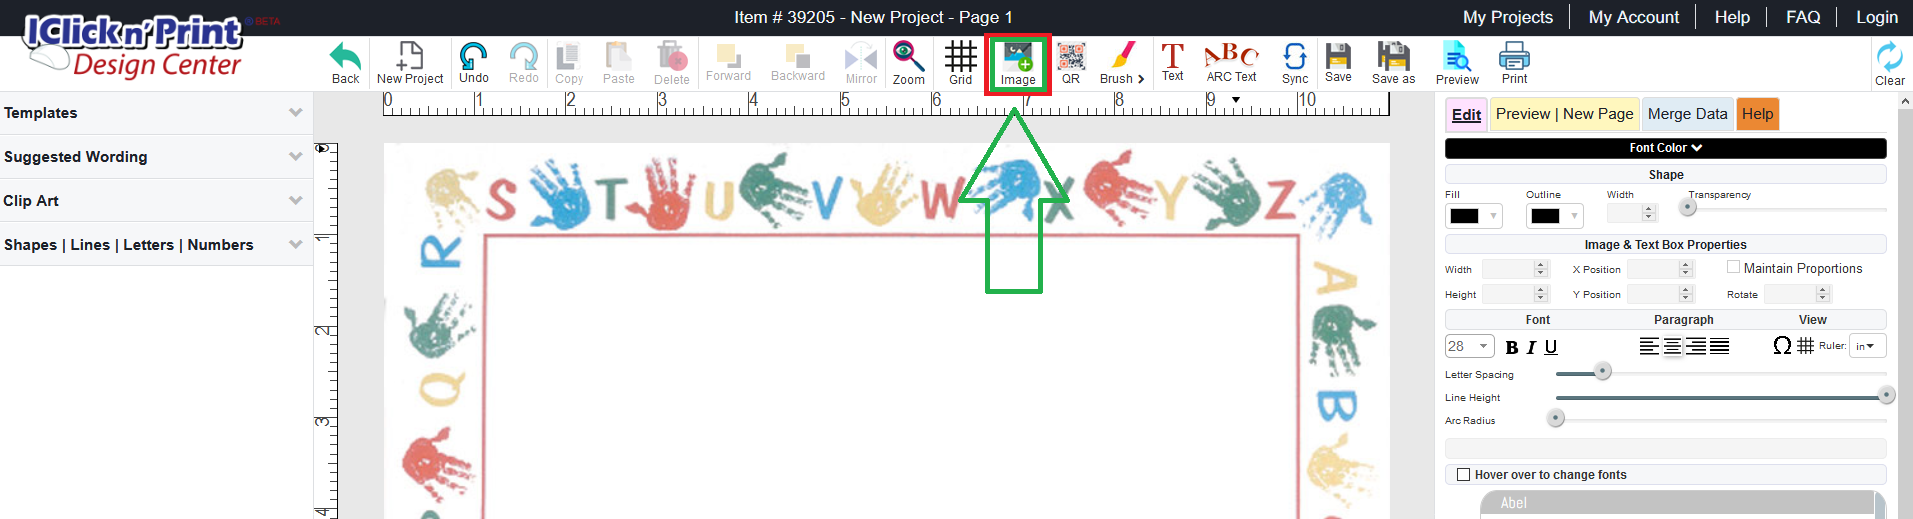
Select the Image Icon in the top menu, see image attached. Upload an maximum 2 MB image from your computer.
Use Transparency (EDIT tab right side) to make the image fade away and use it as a background. Select your image or logo and change the transparency. This feature works great for watermarks when using your logo. Image & Textbox Properties allow you to maintain proportions, rotate and change the W and H positions (EDIT - Right side)
Click the Print icon top menu - see image attached.
PRINT means DOWNLOAD PDF file and save it in your computer for printing. If you cannot see all the top menu icons, change the screen resolution to a recommended minimum 1280x768 pixels. To do that, right click in your Desktop and go to Preferences/Properties where you change the screen resolution.
Print action will lead you to save your project if you have not done it yet. It will create a PDF file that you should save in your computer.
Open the PDF from your saved file location and print it on a test page, before starting to print on a purchased product.
Test printing will help you adjust and beautify your project to perfection. We advise that you read and respect the suggestion prompts available during the print steps.
Download PDF will open the file in a browser. We do not recommend printing from the browser as it adjusts the text and images to fit to page.
This will change the position of your elements and create a different look.
Always print the file from the saved pdf.
To avoid losing your data, Login/register before you start a project.
Save it with a name. you will find it in MY PROJECTS
Loading issues appear when you have a project with many pages or cards with many images on.
Example - a project with over 20 pages and images on each page.
Break your projects in smaller pieces - fewer pages per project.
Use save as to save a project under a different name.
ie: certificate project 1 can be saved as certificate project 2 with SAVE AS when you manually change student names.
You will have 2 projects that you can customize and download for print.
As you add new pages see PREVIEW | NEW PAGE + keep using the Save button.
The Print button will convert your project file data into a PDF file. The conversion may take longer if it has many pages heavy with data and images.
Wait a few minutes. If you think the screen froze, use the Back button and open your saved project again from My Saved Projects.
Remove large size image files and re-upload resized images of up to 1 MB each.
Before using MERGE, read the whole instruction page that basically says:
For Certificates, Letterhead, Brochures, Greeting Cards, 4 up Note Cards, 4 up post cards, use up to 20 pages per 1 project. To get faster exports use 10-15 pages.
For Mailing labels (30/page) use 5 pages max or 150 mailing addresses.
For Business Cards, Place cards and RSVP Cards, use 5 pages per project.
Make sure your pictures and logos are less than 1 MB - resize them to be up to 100 KB.
Remember, the bigger the data the slower the page load!
When you SAVE your file, wait until you see the message that the file was saved.
If you logout or close the screen your file will lose elements and will not load the lost data in the PDF.
If you cannot remember the store of purchase check the box My Store is not listed here and add the correct name of the store.
We will add your store to our store list so next time you can choose it from the drop-down store list when you type the first few letters.
If you received the item as a gift, type the letters "rec" in the store name field and then choose "Received as gift" from the drop down list.
Use the template of your choice by selecting one from left menu TEMPLATES.
Double-click in the text box to edit the existing text. Increase the text box length if you plan on lengthy text, especially with Merge.
You may change the position of text boxes, shapes, lines, images.
Move one or more elements by selecting the boxes and using the keyboard arrows.
Remove certain elements - images, word art or even textboxes - click - delete.
Change fonts, font sizes or color.
Do this by selecting the text in the box you plan on editing. You may replace existing images - click on image - Delete button Top menu or using keys.
Add lines, Clip Art and Word Art from the left panel.
Upload an image from your computer - max 2 MB.
Use Merge after you have designed the final template or add new pages to customize it.
New page will duplicate the template.
Use save as often as possible so you preserve your work.
See images attached.
Find Templates:
Search Templates:
The Templates category located in the left menu has multiple categories and subcategories of templates by theme and holiday.
If you are customizing a certificate - choose Awards & Recognition and select your theme from the Category or Subcategory drop-down - click on +.
Use the Search in the pop-up TEMPLATES page to find what you are looking for.
Select a template of choice with click Use. Wait for the template to load.
Start customizing or choose a different template.
The new template will replace the existing one.
Watch a Demo on How to Customize a Diploma
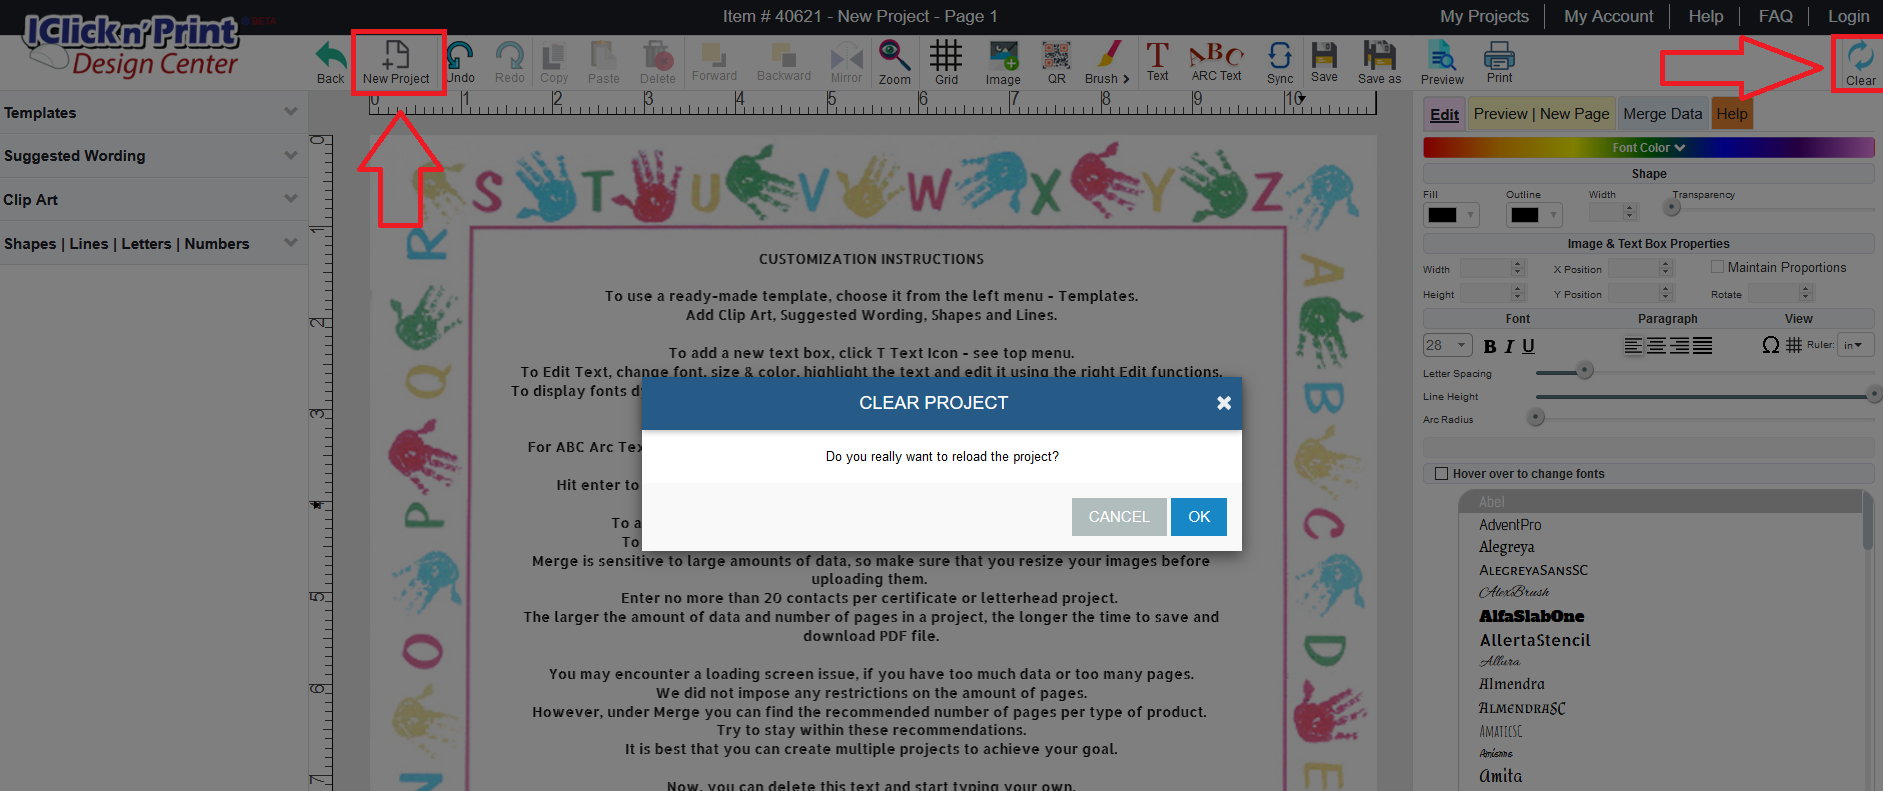
To start from a blank page using the same item, press the Clear icon- see image attached.
To start a new project using the same item number click New Project - See image attached.
Images open in new tabs.
Watch a Demo on Merge Certificates Data
MOZILLA FIREFOX


Certain Geographics® and Royal Brites® items come with preset text boxes and images (default templates)
We created them for you to guide you and to save your time by making things easier.
Examples may be cards, mailing labels and items that would require repetitive work.
Most items such as certificates, letterhead, etc can use customized templates - left menu Templates.
Find Templates:
Search Templates:
Click any of the two Search buttons and insert your item number Click Find item # will display an image that shows the item number in the barcode.
Do not use # when searching for an item number
You can also search for a name. for small items like seals, cards and labels it is important to choose the exact item number.
For the larger products (letterhead, certificates, etc you can use any item number that has the same design
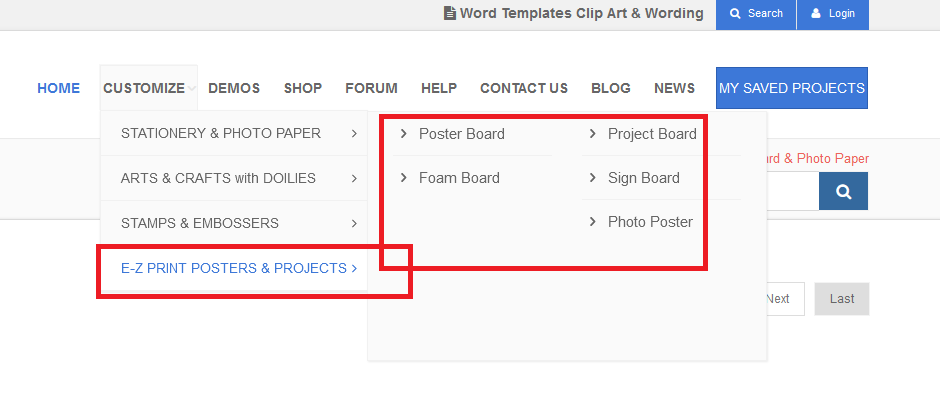
Poster Board Foam Board Project Board and Sign Board are set up by size and not by item number.
Choose the E-Z Poster and Project from the CUSTOMIZE top menu - see image attached. Then, choose a size.
To match the color of your board choose a color from the Background
Click FREE CUSTOMIZATION under the product image
Select the correct orientation for your item and the project will open ready for you to customize it.
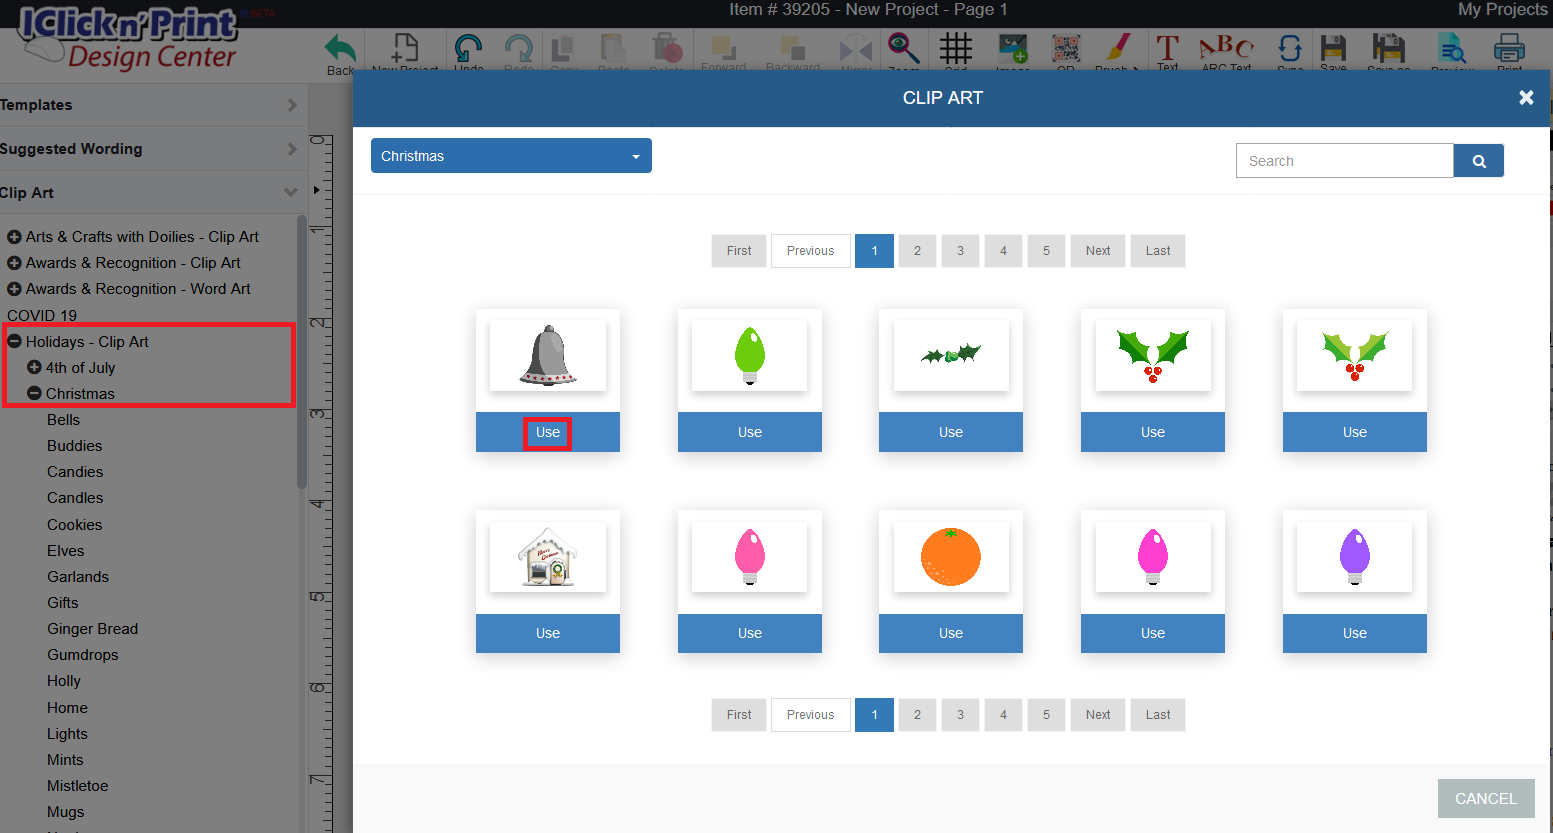
Search using the search box or check the Clip Art category list by theme and holiday.
Word Art offers text in fancy fonts that can be used in certificates, awards and diplomas, on invitations, etc.
Please let us know what's missing
Word Art is great for Geographics Awards and Recognition products such as certificates and diplomas, for graduation events, invitations and cards for special occasions and events and more.
Word Art was created with fonts that are not available in Iclicknprint.
Word Art is available in the left menu under Clip ART.
It has great use for Geographics Awards and Recognition products such as certificates and diplomas and graduation stationery.
Also great for invitations and cards for special occasions.
Word Art was created with fonts that are not available in Iclicknprint.
These are images that can be resized with a drag of a corner. Use it as it is.
Add the Word Art of your choice and increase or decrease its size.
Use Image & Text Box Properties to rotate the Word Art and Transparency to reduce the color intensity.
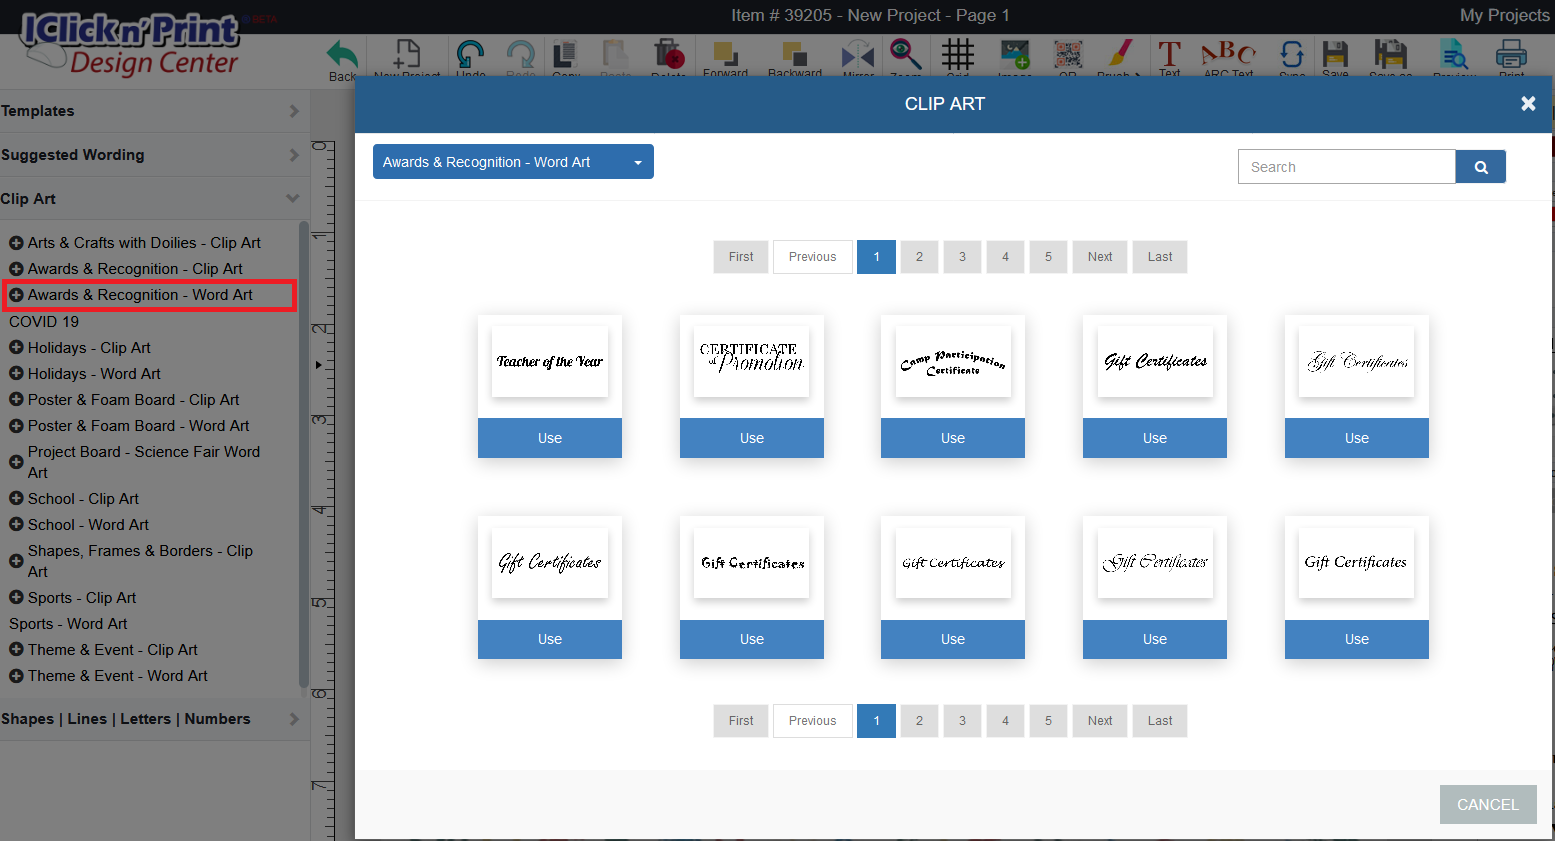
Clip Art is available in the left menu.
You will find there a combination of Clip Art and Word Art by category - all these are images.
Click the plus + sign to open a category or a subcategory and choose from the drop-down list of clip art.
Click on a subcategory opens the items in it . click use after browsing the Clip Art pages. You can use Search, as well.
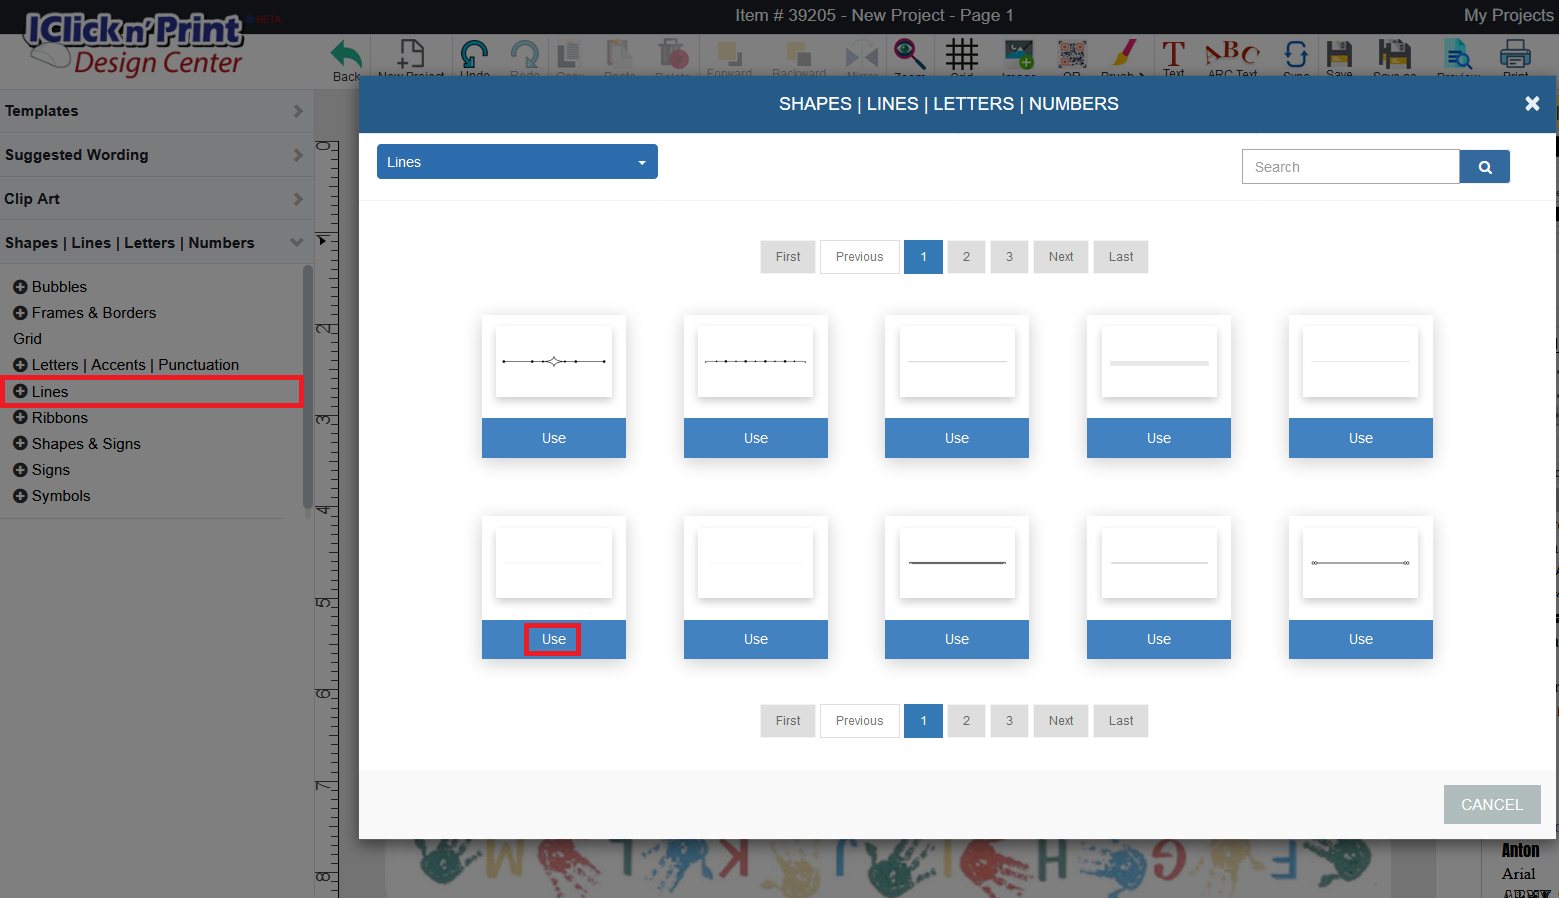
Select the line. it will appear thick at first. modify it by pushing down the top just like you would flatten a text box. To easily select a thin line, select it with a swiping movement from bottom right going up to the left. the selection works like in MS Office - Word.
You can move the line using your keyboard arrows after you have it selected.
Please let us know if there is anything missing in Shapes and Lines.
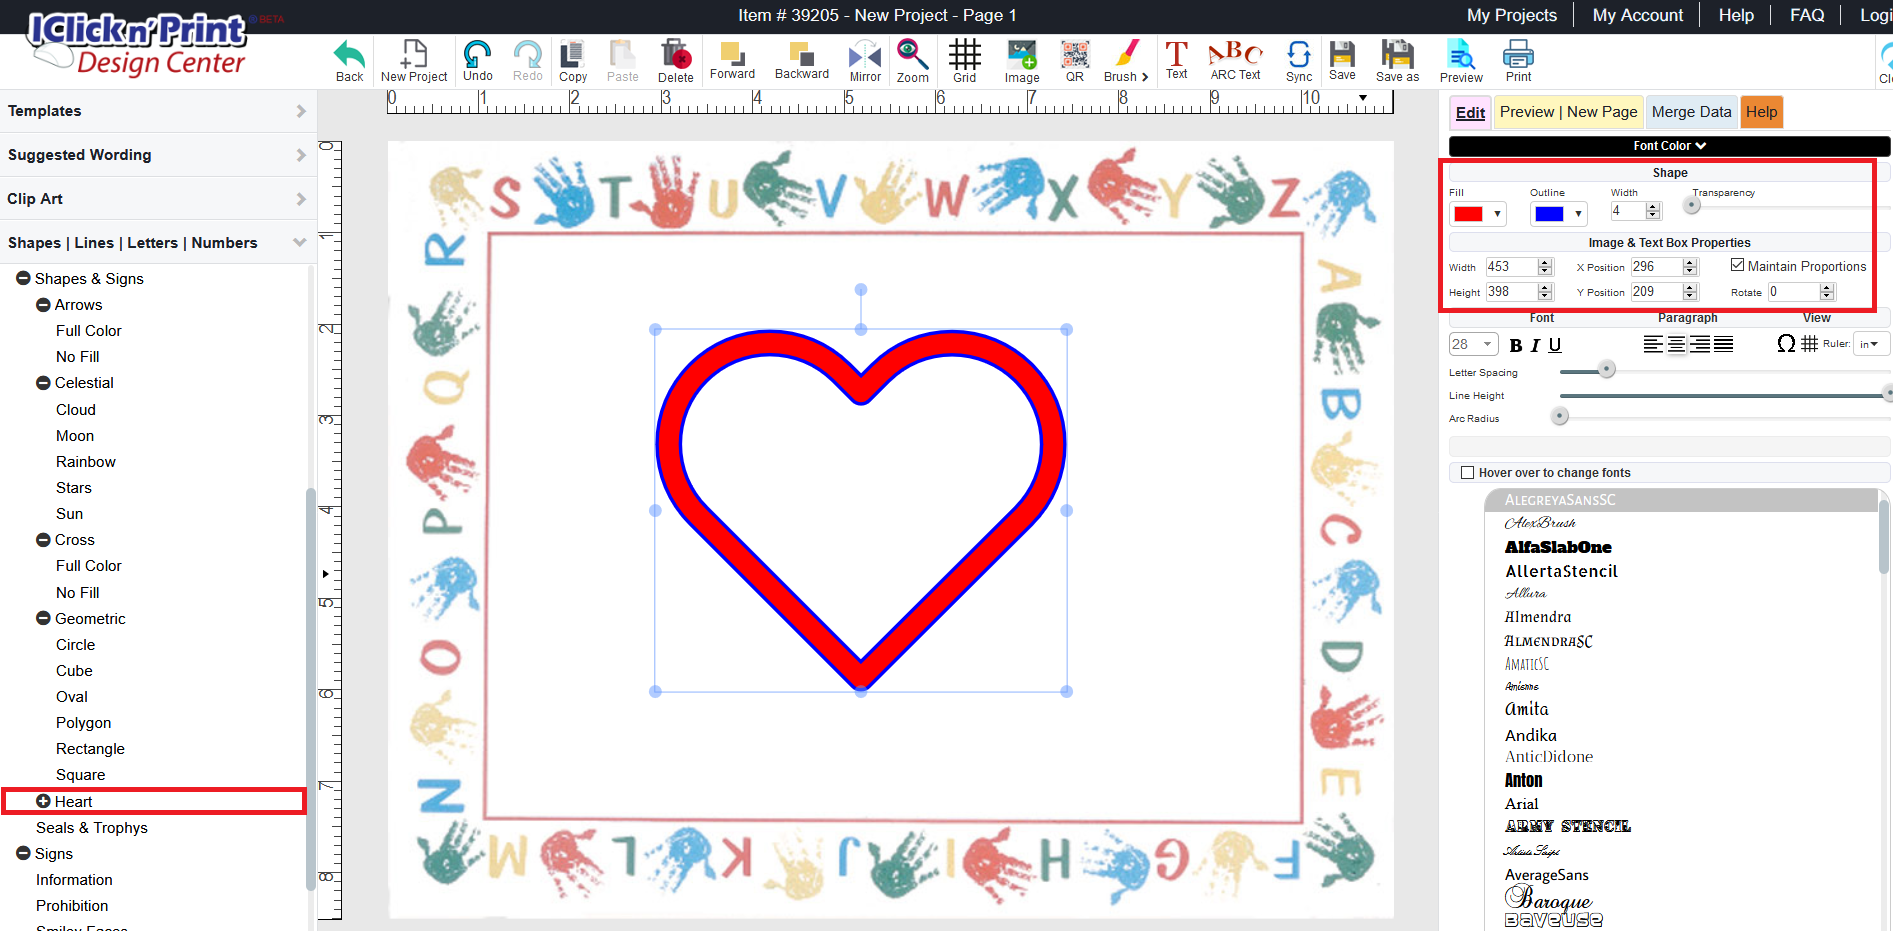
Add the shape and on the Edit panel - right, look for Shape Fill, Outline, Width and Transparency.
Use Fill color to color the interior of the shape,
Use Outline to color the shape borders or defining lines
Use Width to increase or decrease the thickness of the borders.
Use the Transparency bar to make the color fade away.
Please let us know if there is anything important missing in the Shapes and Lines category
Add a shape from the left panel - 4th tab down - see image attached.
Categories of shapes with subcategories have a plus sign + click on it and find what you are looking for.
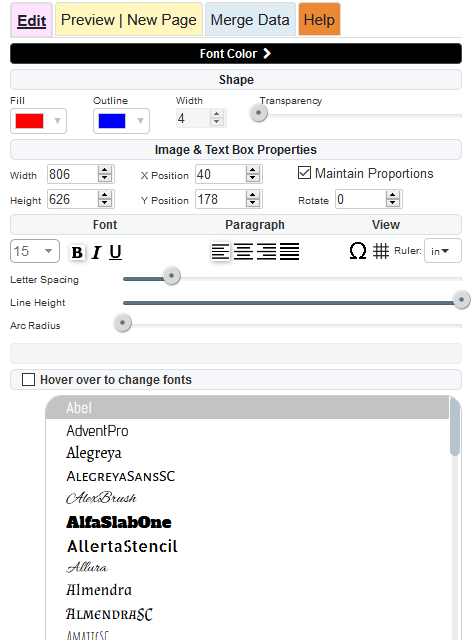
In the Edit right panel - under Font Color use the Shape options:
Fill, Outline, Width and Transparency.
Select a line - see image attached. Click Use. Drag the line with drag and drop. Hover over the defining box until you see a cross. Use the keyboard arrows to move it around. Resize it by dragging the margins from the right (see the double-arrow) - to make it shorter or longer. Resize it from the top or bottom to increase its height. Use Maintain proportions, if needed. Use search to find a line.
Use the SHAPE properties in the EDIT (right menu) to change color, thickness, transparency. Use Image and Textbox properties to rotate it, change position, height and width, etc.
Prepare your Excel or CSV file as follows: Remove any headers and prepare the data in sheet 1.
Each column should contain specific data, ie. all student names in one column.
Note that your Excel file can contain columns that will not be imported. You can add to your project only data from the columns you need.
In ICLICKNPRINT, your project should contain all the text boxes that will receive the Excel or CSV data.
RECOMMENDED: Enter in each text box the longest text from each Excel file column.
This will help you in two ways:
1. It will offer guidance as to what data to drag and drop in each text box.
2. After the merge is done, the text box sizes remain unchanged. This saves you some work since you do not have to resize the text boxes to fit the text.
Arrange your text boxes and images in the exact positions you want them to be on the printed product.
Alternately, name each textbox so you know what data to drag and drop there. ie Student Name, Achievement, etc.
Edit fonts, colors, font sizes, before merging the data. Otherwise, you will have to do the editing in each sheet, after merge. This would be a huge waste of your time.
Use Merge to import data only when the project you are customizing looks exactly like what you want to print.
Merge will add extra pages in your project.
You only need to customize one page. All the rest will look the same bur will contain the data imported.
Please report and bugs in our Forum
The Excel file needs to have 3 columns for 3 textboxes and 4 columns for 4.
Attached is a template you can use. If you have a sheet header, please remove it.
Just enter the data directly after setting up the label with the correct text boxes.
Increase the length of the boxes to a maximum and customize the boxes with desired fonts, font sizes and colors
Watch a demo
Download Merge Excel Labels 3 lines Template, file
Merge labels - 3 lines
Remove Address 2
To add a new text box, click T Text - see top menu.
To Edit Text, change font, size & color, highlight the text and edit it using the right Edit tab features.
To display fonts dynamically, check the hover over box and scroll down over fonts until you like the choice.
To use a ready-made template, choose it from the left menu - Templates.
Add Clip Art, Suggested Wording, Shapes and Lines.
To add a new page, click Preview | New Page - the next tab after Edit.
To merge data click Merge - the next tab after review | New Page.
Merge is sensitive to large amounts of data so make sure you resize your images before uploading them and enter no more than 25 contacts per certificate or letterhead project and 90 contacts per label or cards projects at one time. the larger the amount of data and number of pages in a project the longer the time to save and download PDF file.
We did not impose any restrictions on the amount of pages.
However, read under merge the recommended number of pages per type of product and try to stay within this recommended number per project. you can create multiple projects to achieve your goal.
Once you understand the menus and what each icon means it will be easy. Make sure you register and save your project in the beginning.
Registration is required since the project will be saved before being printed.
You can always get back to your projects in My Saved Projects.
What you see on the screen is one of the labels. You can click on Preview/New Page on the right side of the screen, in the upper part, and you will see all of the labels. The program usually synchronizes the content of one label in all of the others, but if you want to change that you can select Create separate cards/labels from that same menu on the right side., and it will allow you to create different labels.
One label has 4 boxes inside it. You need to operate with each box at a time. For the first box, you can double-click inside the box and there will be a black line blinking inside the box. You need to delete First name Last Name and type the name. To change font, size, color, highlight the text in blue by double-clicking inside the box. Go over to the Edit tab that is next to Preview/New Page to change font, size, color.
For the next box you would need to repeat the same steps. Once you are done with a label, go back to Preview/New Page and click on the next label.
A blue rectangle will appear around the label that is currently selected. Then you can click on the next label and continue adding addresses.
In order to replicate the wording of one seal into all of the other seals, you would need to select that box in which the wording is, please make sure that it's the correct box selected, than you can use the SYNC button on the main menu just above the seals. The other seals need to have those boxes that say Enter Text inside them. Also, please note that the sync function is not working for images, only for words.
You need to click on the ARC Text option on the upper right side of the window inside the program.
A text box will appear in your project and in order to type text into it, you'll need to write it not in the text box, but in the field from the lower right side menu where it says “Enter arched text” and in the red box.
You can click on Preview/New Page Tab on the right side of the screen, in the upper part, and you will see all of the cards.
The program usually synchronizes the content of one cards in all of the others, but if you want to change that you can select Create separate cards/labels from that same menu on the right side and it will allow you to create different cards.
To change font color, highlight the text in blue by double-clicking inside the box.
Go over to the Edit tab and on the top, there will be a Font Color bar, click on the bar and it will show you all the colors, then click on the color you like to change for the font on the template.
Choose the Image option from the upper menu and upload an image saved from your computer.
For the Transparency option(located in the right side of the page), select the picture for which you want to change the transparency.
Drag the Transparency slider to set the exact percentage of transparency you want.
Check the hover over box and scroll down over fonts and the click on the font of your choice.
To add a New page, click PREVIEW | NEW PAGE - the next tab after EDIT and click on the add new page icon.
If your page contains large images or clip art, a new page will take longer to load.
Click on the text box and you can either use the Delete icon for the upper menu or click on Delete key on your computer keyboard.
The templates for these products usually come with two pre-existing text boxes over each seal - a regular one in the center and an arched one that goes around the seal. To quickly customize a whole page of seals, edit any one of the seals on the page, select the text box, then use the Snyc button.
This will synchronize the content in that text box across all the other seals on the page.
Please note that for the time being, the Sync feature only works for the pre-existing text boxes - other elements such as uploaded images or new text boxes need to be copied, pasted, and positioned manually.
To Edit Text, change font, size & color, double click inside the text box, highlight the text and edit it using the right Edit functions.
Double click inside the desired text box, highlight the existing text and start typing your own text.
Click on the text box.
The box is designated by eight blue small circles, or handles, around the perimeter).
Use the mouse to point to one of the blue circle.
Drag the blue circle to resize the text box.
Release the mouse button when the text box is the size you want.
Home > ICLICKNPRINT > FAQ IClicknPrint > Change Font Size & Color Change Font Size & Color
Changing font style, size, color and alignment requires a highlighting of the text you need to change fonts to.
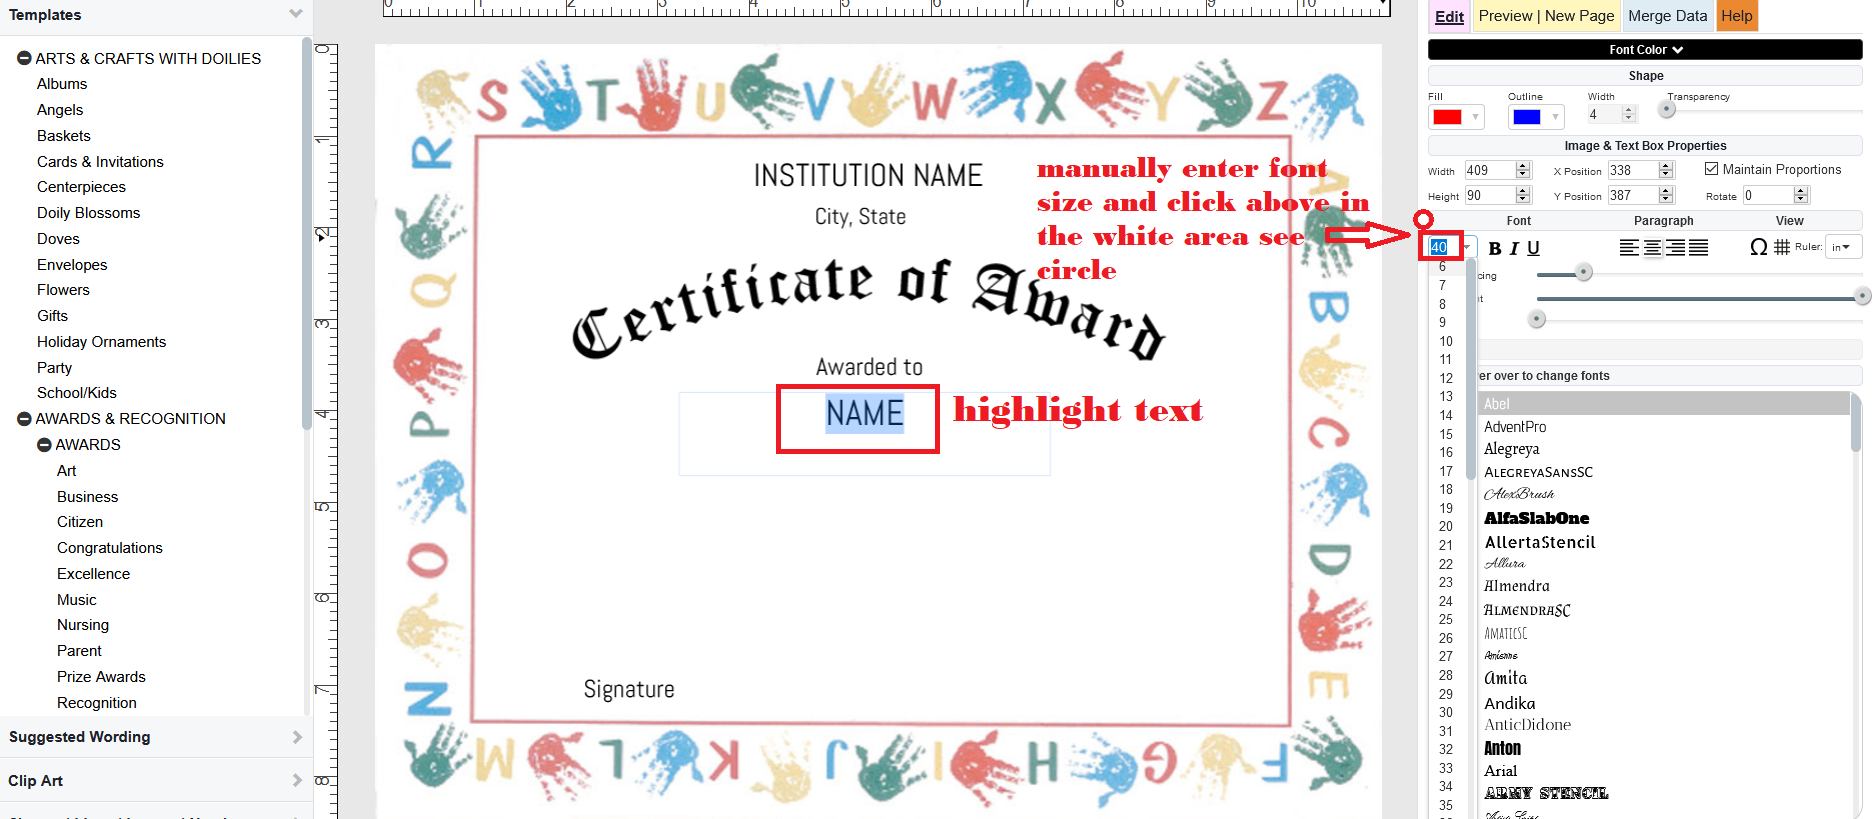
To change font size - see attached screens - select the text and choose a size from the list of sizes.
Or, select the text and manually enter font size - click on top on the white border - image attached.
A double click on a word inside the text box will highlight it automatically.
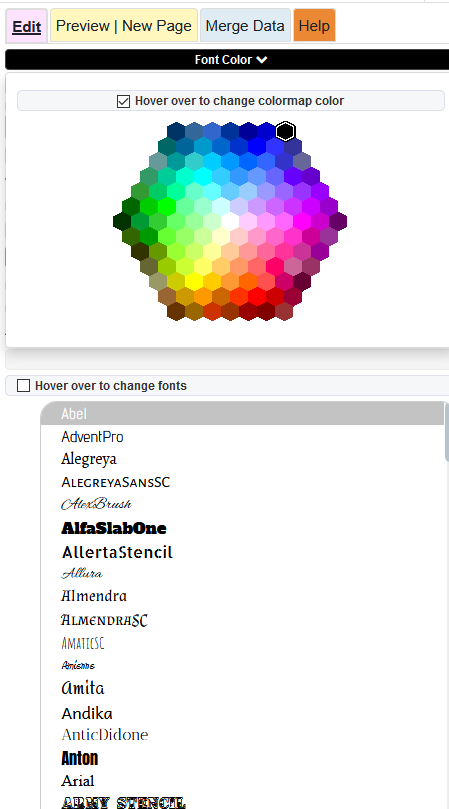
Font color can be changed by selecting the text and click on Font Color - Top option in Edit (right side).
Check the box to Hover over and play around with colors. Do the same for font style.
Use Paragraph icons to align text in your box.
See images attached.
Manual font size:
Font color:
Font Style:
Font Size:
For a successful result, read carefully the prompts that give you instructions while customizing your project.make sure you proof read the project so there are no mistakes and it is good for printing.
When you click Download PDF you will have two choices: Open file and Save file.
Do not choose Open file. Why? Open file opens your file in the browser an the print command prints it from the browser. All browsers apply FIT to scree or FIT To page thus modifying the position of your text and images on page.
Choose Save file. Save the downloaded file in your in your computer. Give it a memorable name and remember location or folder you save it in. Open the file and print it from there.
Print settings should be chosen with care.
Check the correct paper orientation, choose the right paper size and paper type.
NEVER USE FIT or FIT TO PAGE setting.
DO NOT USE SCALING. Scaling should be OFF
Only use ACTUAL SIZE!
TEST PRINT Print your project on a blank, plain piece of paper first.
Check the alignment of the text and images against the design product or paper board.
Print on the actual product only when you are satisfied with the result.
For Royal Brites large-size Poster, Foam and Project Board, your project can be printed on plain paper or transparencies.
For transparencies, use the mirror image tool in our main menu. This will allow protection of the ink or toner.
You can clip the letters off the white paper and glue them onto your board project. Make sure the letters print fully so you do not have to collate pieces.
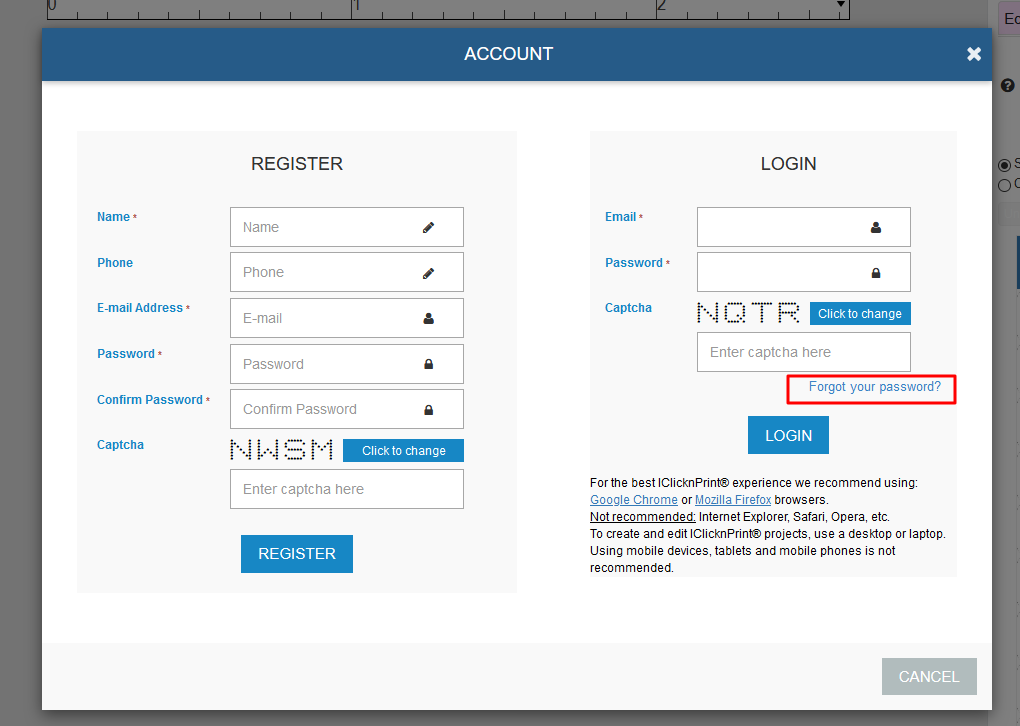
To create an account, please click on Login (the blue button on the upper right side of the page) then on Register. Fill up the name, phone number, email address, create your own password, fill in the Captcha in the box and then click on Register. You will then be logged in and you'll see your name in the upper right corner instead of the login button.
You need to register because the system needs to save the project under your account, before you print.
You will be prompted to save it with a name. You can create multiple projects with different names.
Every time you get back to iclicknprint, you can find your projects under MY SAVED PROJECTS.
Open, modify and print them.
Inactive projects will be deleted after 6 months of inactivity.
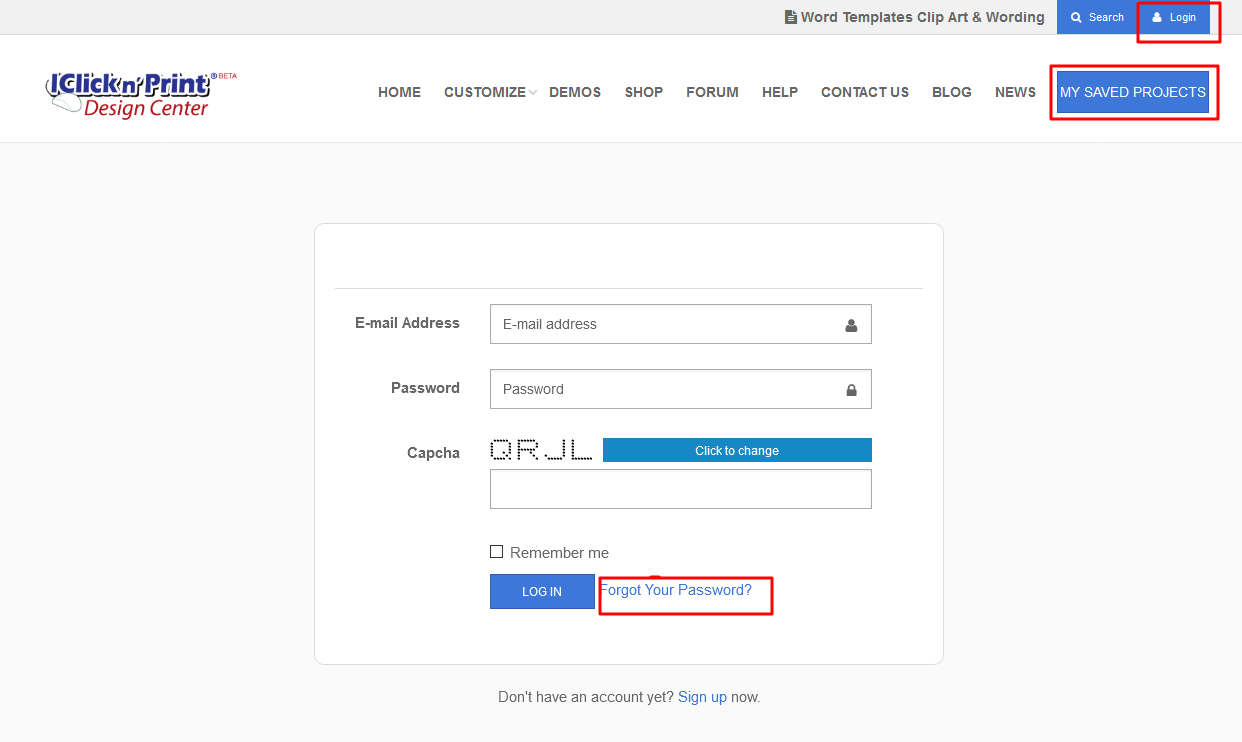
In Iclicknprint, click Log in and click Forgot password. Enter your email address and check your email to get the new password.
Check your junk mail. Sometimes, users enter an incorrect email. If you cannot get it, please contact customer service.
Once you have the temporary pass, go to My Account on top of the page - right side and change your password.
You can also click MY TEMPLATES and Forgot Password and enter your email.
A temporary password will be sent to you and once logged in, you can change your password.
See images attached.
Forgot Password - Log In
Forgot Password - My Templates
Create text boxes in your iclicknprint (ICNP) project. Use the T icon Main menu.
First, save the project under a name so you do not lose it should internet connection have issues or you refresh the page, etc...
Copy the text from your computer – to the ICNP text box. To do so,
Double click in the ICNP text box until you see a cursor and delete the Enter Text that textboxes come with, by default. Use the top menu icon paste.
You can use CTRL C for copy
and in the Iclicknprint enter the textbox – double click and use CTRL and V to
paste
To save you the back and forth, you can paste the entire text in one box.
Then, add new textboxes boxes and CTRL X cut text from the main box and CTRL V Paste in the next box.
At the end, you can change fonts in each box. Just click the box until you see it in blue lines. Then, check the Hover over Fonts and hover until you click on the font you like
To increase text size - highlight the text and enter a number by hand in the font size box, click just outside of it - in the blank space on top of the font size box.
Or choose a number from the drop-down.
To do this easily, add a text box for each different font or font size.
It is easier to change the whole text font and size in one box than to change specific text in a large text box.
Plus, you have the flexibility to move the boxes around with your keyboard arrows.
To select one or multiple text boxes:
Click the first box, click SHIFT then select the second box etc. without releasing the selection You can copy and paste them or move them on the page with the left, right, up and down arrows.
Get used to this free ICNP tool. If you make mistakes, you can use REDO ior UNDO – top menu.
To learn how to use ICNP use the demos https://www.iclicknprint.net/demos